07 V10 TDI. And so it begins...

   #101  

Jack@European_Parts

Gone But Not Forgotten
Professional VCDS User
Joined
Jan 29, 2014
Messages
21,923
Reaction score
9,308
Location
Montgomery, NY, USA
VCDS Serial number
C?ID=57337
I'd recommend taking off the clips and observing the controllers under the plastic covers.

Take pictures and post please.
 
   #102  

Flaps10

Verified VCDS User
Verified
Joined
Jun 20, 2014
Messages
512
Reaction score
952
Location
USA
VCDS Serial number
C?ID=219700
Last night after posting the last message I popped the spring clips off of both controllers to see if there was anything obvious.

Power steering fluid had seeped past the gasket and gotten to the circuit board. It wasn't drenched. I had been thinking that maybe PS fluid will conduct electricity. A couple of days ago I stuffed the probes of my multi meter into the fluid i had drained and couldn't get a non infinite reading, so i thought maybe it doesn't. But circuits are way more sensitive than the currents I'm used to (flashlights to toasters).

I might be at the turn around point
 
   #103  

Jack@European_Parts

Gone But Not Forgotten
Professional VCDS User
Joined
Jan 29, 2014
Messages
21,923
Reaction score
9,308
Location
Montgomery, NY, USA
VCDS Serial number
C?ID=57337
   #104  

Flaps10

Verified VCDS User
Verified
Joined
Jun 20, 2014
Messages
512
Reaction score
952
Location
USA
VCDS Serial number
C?ID=219700
At Jack's request, here are some pictures of the guts of my bank 2 controller
IMG_20160708_081927_hdr_zpsate2f0bc.jpg

This is the mechanical part. That electric motor can be found in toys and cheap appliances the world over. I know of it as a Mabuchi 380, aka "speed 400" can motor and they can be purchased in bulk for a few bucks each.

The two rabbit teeth along the lower edge are the contacts for the motor. I didn't put voltage to it because a) I don't have a ready, controllable source of DC power and b) that gear train doesn't go round and round, which means that if you put power to the pins it will probably head off one end of the rocker gear and bind up.

Here's the other side:
IMG_20160708_081854_hdr_zpsa3mtfvpp.jpg

I could see visible fluid migration between the two arrows. The red arrow points to the other side of the rabbit teeth, where the contacts come together. One of you out there probably has corrosion here. Me, I keep mine well douched with Pentosin to avoid that problem. You can't see it in this image but last night I could see that round pattern (it's a rotary encoder to give feedback as to the actual vs. commanded position of the crank arm) was damp from about 3-7 on the clock dial.

Here it is in open face sandwich layout.
IMG_20160708_081824_hdr_zpsrc4bmmck.jpg

You may be able to see how wet the sealing surface is between the arrows. The round disc is the coordination to the encoder pattern on the other half.
 
   #105  

Flaps10

Verified VCDS User
Verified
Joined
Jun 20, 2014
Messages
512
Reaction score
952
Location
USA
VCDS Serial number
C?ID=219700
Good tips Jack, who seems to be reading my mind a post ahead.

Spray it out with what initially, Jack? As for testing them I just realized that I'd be able to plug them back into the dangling wire harnesses to see if they function at all/consistently/the same as each other.

I recall that they take a sweep when you first fire it up as part of a POST (want every chance to pull that friggin' "OMG! OH NO's!" warning chime when you turn the key, right?). Hmm.
 
   #106  

Jack@European_Parts

Gone But Not Forgotten
Professional VCDS User
Joined
Jan 29, 2014
Messages
21,923
Reaction score
9,308
Location
Montgomery, NY, USA
VCDS Serial number
C?ID=57337
Okay I would use oven cleaner on board and then rinse dry with distilled water.

Then I would run new solder legs to all those weld joints with overlays.

Clean again/rinse........ dry heat board slightly and spray Insul.

Verify diagnostics before sealing of course and then wrap it up.

The gaskets on that cover are junk and insufficient.
That type solder joint by welds is also bad and fails in every ABS, Mech and CVT or any use I happen to encounter.

Jesus saves Jack invests........
 
Last edited:
   #107  

Lgibson

Verified VCDS User
Verified
Joined
Jun 4, 2014
Messages
162
Reaction score
103
Location
USA
VCDS Serial number
C?ID=41716
Remember that those controllers are paired with their turbos. Their was a lengthy thread on this problem here. Poster encountered difficulty matching replacements and VW sells matched pairs only (turbo plus controller)
 
   #108  

Flaps10

Verified VCDS User
Verified
Joined
Jun 20, 2014
Messages
512
Reaction score
952
Location
USA
VCDS Serial number
C?ID=219700
Wait. What?

So if did send them off and they replace a circuit board it wouldn't pair p to the car when reinstalled?
 
   #109  

Flaps10

Verified VCDS User
Verified
Joined
Jun 20, 2014
Messages
512
Reaction score
952
Location
USA
VCDS Serial number
C?ID=219700
Jack, is that a typo? You want me to use oven cleaner and then water on the circuit board?
 
   #110  

Jack@European_Parts

Gone But Not Forgotten
Professional VCDS User
Joined
Jan 29, 2014
Messages
21,923
Reaction score
9,308
Location
Montgomery, NY, USA
VCDS Serial number
C?ID=57337
Jack, is that a typo? You want me to use oven cleaner and then water on the circuit board?

It is not .........don't be afraid.:p

Oven cleaner will brighten the board ( foam up and plastic brush the board light ) and make the connections better.
Distilled water to rinse and then immediate heat and air to dry.

Then the solder overlays .........test and then seal.

The use of a magnifying mirror is advised, to see what you normally or my case can't see otherwise for inspection.
 
   #111  

Flaps10

Verified VCDS User
Verified
Joined
Jun 20, 2014
Messages
512
Reaction score
952
Location
USA
VCDS Serial number
C?ID=219700
Well my woman sent the controllers off to our original destination for "rebuild" before I could stop her, so I was unable to spray the delicate electronics with meat remover and water.

They arrived last night at my house. The place that did them put tamper stickers over the case and they came with a warranty, so I'm feeling like I need to install them as is and run them until, well, they do this again.

IMG_20160714_200152_zpscwm72phu.jpg


Also arriving was a package from Jim Ellis VW containing the mechanical "transmission" for the windshield wipers, a replacement turbo hose (the right one has some little cracks which have been goobered up and have since failed again).

I swapped the wiper motor to the new monkey bars and installed them. That's when I found out that the plastic cowl piece that goes across the lower edge of the windshield (the one that came in my last Jim Ellis order) was cracked bigger than crap right in the middle. I don't think it's happened in my care and I'm the only one in my garage, so it's possible that it was damaged in shipping and I just didn't notice. Poo.

Once I got the wiper transmission in place it occurred to me to NOT put the arms on until I've had a chance to verify that the thing is starting from it's resting position. That could be ugly if it weren't true.

I thought I could do that last night prior to doing anything else but decided to just hold off until after I have restarted the engine before I worry about wipers.
 
   #112  

Flaps10

Verified VCDS User
Verified
Joined
Jun 20, 2014
Messages
512
Reaction score
952
Location
USA
VCDS Serial number
C?ID=219700
I managed to get the left controller installed yesterday. I had called my youngest son over to help me because I thought I was going to need one of us laying directly under the transmission to hold the controller against the bracket and the other would be by the wheel well installing the three fasteners.

Prior to installing the controller I grabbed some silicone "rescue tape", the non sticky kind that only sticks to itself and is rated for quite high pressures and temperatures. I used it to wrap around the gasket seam of the controller, right over the top of the inspection sticker and well off to both sides of the parting line. It's non permanent, and while I wouldn't submerge it in anything it will withstand a really good douching of Pentosin should my banjo union fail again.

My kid got here and then went to go chat with his girlfriend so I crawled under to see how bad it was going to be. I had the first bolt installed in just a few minutes, mostly using one hand to both hold the controller and thread the bolt in (left hand no doubt). I greased up the pivot point with Syl Glide and then used a combination of needle nose pliers and a long screw driver to install the snap ring.

I then reconnected the coolant lines to the Webasto and installed the wheel well liner. For the record, the job could be done by just removing the rear half of the fasteners and just flexing the liner out of the way to get to the hose connections. Recall that I wasn't sure what I'd find behind there and was being careful. Anyway, installing the wheel liner went well. I ran the crush washers over a very fine stone to clean them up and then installed the sparkling clean banjo bolt and torqued it per the factory manual.

I drained the crankcase oil and installed a new plug. Up top I filled up the PS reservoir with all the Pentosin I had on hand, and then filled the crankcase with oil from the dealer. I filtered the coolant I had drained out because a couple of moths had killed themselves and there was a layer of dust on top of the surface. I've got about 95% of the coolant I drained out back into the coolant reservoir and I'm hoping it burps itself effectively. Since the Webasto isn't likely to fire up any time soon I wonder if there's a way my awesome Ross Tech ^tm software could trigger it to function, in the way that Durametric allows me to tickle a whole lot of system with a mouse click. If I could provoke it to circulate coolant it would help in bleeding air from the system.

I got the right side controller installed today. Funny, it's the easier one to take off but harder to install. It's harder because the offset nature of the front differential housing precludes access by anyone not born with a German mechanic's extra joint between the elbow and wrist. I had to jam my forearm up through the lightening hole in the lower control arm, up behind the front axle housing and subframe to support the controller with two fingers while I F'd around dropping and losing all three bolts trying to just get one in. Eventually I located two of the three fasteners and scrounged for a SHCS of the same thread diameter and pitch to get all three installed. The snap ring on that side also fought me the whole way, but it's on and secure.

Every connector back together up top, all plastic panels back underneath. I'm out of excuses.

I'm going to hook it up to my laptop after typing this and clear the codes and then see if this hooker will start.
 
   #113  

jyoung8607

FoRT
Verified
Joined
Feb 25, 2014
Messages
2,780
Reaction score
4,490
Location
Cincinnati, OH
VCDS Serial number
C?ID=25607
I've got about 95% of the coolant I drained out back into the coolant reservoir and I'm hoping it burps itself effectively. Since the Webasto isn't likely to fire up any time soon I wonder if there's a way my awesome Ross Tech ^tm software could trigger it to function, in the way that Durametric allows me to tickle a whole lot of system with a mouse click. If I could provoke it to circulate coolant it would help in bleeding air from the system.
I don't recall if you can actually light the thing, but I believe one of the output tests will drive the built-in coolant pump for you. Or, you could just supply +12V to the pump directly. Some operations, like clearing a combustion lockout, may require a security access code. I don't recall if output tests require it. RT do not supply the security access code in the stock VCDS label file, because it enables dangerous idiots to carry out unusually dangerous idiocy, but RT support can supply it to you privately if you have a need.

Also, assuming you have an air compressor, go buy yourself a vacuum coolant fill and purge tool. It's one of those "how did I survive without this" tools. Trust me.

I'm going to hook it up to my laptop after typing this and clear the codes and then see if this hooker will start.
Go baby go!

Jason
 
   #114  

Flaps10

Verified VCDS User
Verified
Joined
Jun 20, 2014
Messages
512
Reaction score
952
Location
USA
VCDS Serial number
C?ID=219700
Runs great. Holy crap is it fast. I've got some marmot whistle under max boost but that's a first or possibly even second world problem. I've got to properly bleed the PS system and top it off. I attempted to fake the bleeding procedure outlined in the manual but I didn't lift the front or time anything.

No CEL. My woman will be most pleased. Now I might get my N+1 back from her.
 
   #115  

Flaps10

Verified VCDS User
Verified
Joined
Jun 20, 2014
Messages
512
Reaction score
952
Location
USA
VCDS Serial number
C?ID=219700
Two week update.

A day or so after getting the 7LA EX1 back on the road I followed the PS bleeding procedure in the manual to the letter. It's now tomb quiet which is a huge relief (worth the 1 day cost of the manuals all by itself). The car produced great power for a few days and then seemed to suffer from some transition where it would lag a bit before deciding whether boost would be coming on line. Then it got so that if you babied the throttle it might not boost but if you let off and then "gave it the news" it would pin you in your seats (which never gets old).

I also never got the wipers to work, which hasn't been the end of the world because it hasn't been raining here in the PNW.

Today I am going through three tasks:
1) get the wipers to function
2) re-do all three ground terminals on the firewall
3) lube the upper pivot points of the turbo controllers.

Damn if the manual didn't pay for itself again doing the wipers. I pulled out the monkey bars+ electric motor and decided to get super careful about the installation. I looked through the manual and found where it said I'd have to log into the car and disable the built in stutter that it has for some sophisticated reason prior to disconnecting the plug. Well that ship had sailed so I hoped to crap it wouldn't need something I couldn't do.

In order to access the shaft where the monkey bars attach to the motor you have to pull the whole thing out and get to the back side. Once detached, I plugged the motor back in and turned on the ignition (the manual sez..). The motor rotated and found it's own resting place, and it rotated more than I expected. I figured that I removed the motor when it was in the rest position and arranging the arms per a photograph I'd taken to assure the same position.

Where the manual paid for itself was during the time that I was trying to locate the arms it wouldn't move when the wiper switch was moved. Right there in black and white it reminded me that the wipers would be disabled with the hood up. Dude, I was about to pull hair. It wasn't a new motor, so I didn't think there would be any coding (for wipers. what has the world come to?)

Most importantly, the manual contained a diagram indicating proper set up of the monkey bars showing a 4mm gap between the primary crank arm and a big pin. We all own gauge pins in the form of drill bits so I did some quick math and came up with a "go, no go" pair, either of which would have been accurate enough for this set up, but I'm a geek so there it is.

I moved on to the ground studs because it was much easier to do them with the wiper system out of the car. Afterwards I came back and installed it. Hood down, it works perfectly in all modes. High five to the forehead.

The ground studs:
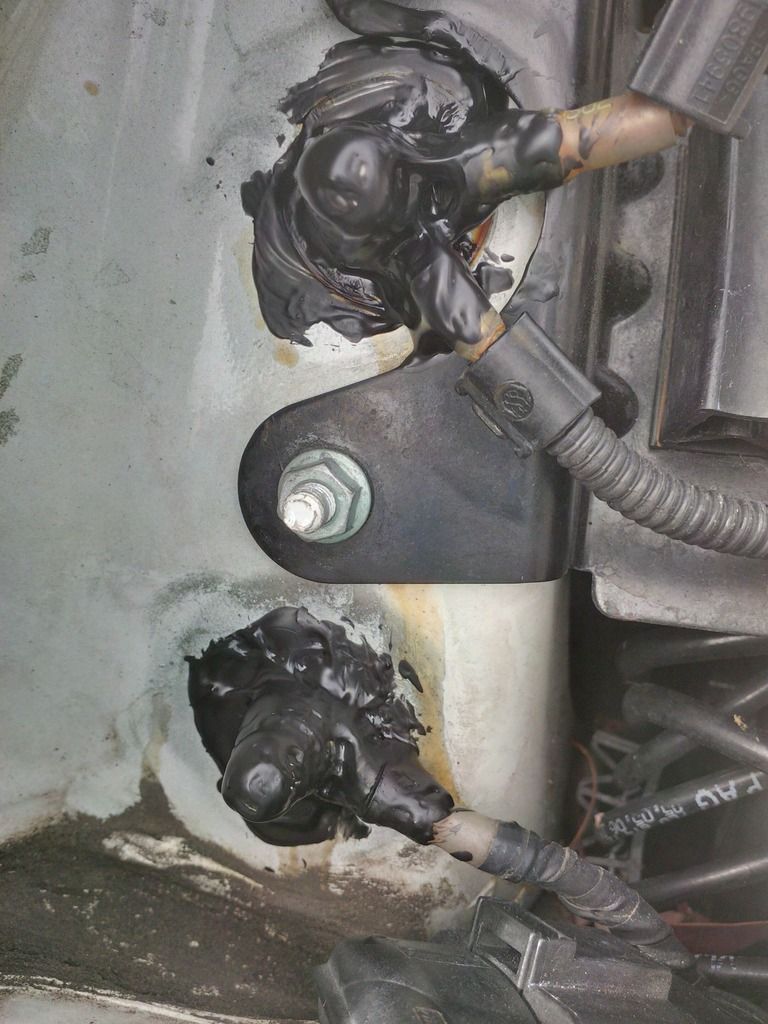
The first one I did is in the far left corner under the pivot point of the left wiper. The plastic cowling has to be out for this entire job, so I'll assume anyone following along will deduce that by now.

I removed the acorn nut with a 10mm socket on a long extension. I then pulled two wires off the ground stud and discarded the plastic tarantula that holds water and debris. I blew the area out with an air compressor (tons of dirt, needles and goo came out). Next I cleaned the area around the ground stud with glass cleaner to remove the more determined crap and corrosion. I wanted to use something that would do a good job, evaporate quickly and not leave a residue.

Using a wire wheel on my dremel tool I polished the two terminals brighter than a new penny and did the same with the ground stud itself, the area around the base of the ground stud and the bottom side of the acorn nut. I reassembled and torqued the assembly and then I painted the whole mess with liquid tape.

IMG_20160730_131347_hdr_zps9a6uqlod.jpg


Then I did the same to the other side. I did them one at a time even though they're ground wires so mixing them up wouldn't have an effect. The more outboard terminal (the lower one in this picture, and in fact down hill (perhaps downstream would give a better visual)) was FULL of goo and water even though it's been in the 80s for days here. Again, everything bright, shiny and clean then gooped with liquid tape.

IMG_20160730_131405_hdr_zpsdy1jby70.jpg


Heading back out now to find a lazy engineer's method of lubing pivot points you can't see.
 
   #116  

Flaps10

Verified VCDS User
Verified
Joined
Jun 20, 2014
Messages
512
Reaction score
952
Location
USA
VCDS Serial number
C?ID=219700
I had poor luck reaching the upper pivots on the controller linkages this weekend, so I've decided to go in laproscopically. Yep, ordered a USB "inspection camera" which is a small diameter 2MP sensor with some LEDs to brighten up the dark places you'll stick it.

I've got a mind to adapt it to a prehensile stick which will also have a piece of tubing that I can squirt rhino mucas through. It should be here tonight when I get home.

Turbo activity is falling off again :-(
I know the intakes are plugged up so I'll pencil that joyous process in.

I'm also going to fashion up some EGR block off plates to replace the EGR gaskets. Sorry Jack. When I get sold shitty engineering I have no remorse in making it work better.
 
   #117  

Jack@European_Parts

Gone But Not Forgotten
Professional VCDS User
Joined
Jan 29, 2014
Messages
21,923
Reaction score
9,308
Location
Montgomery, NY, USA
VCDS Serial number
C?ID=57337
I can't but help feel your pain ........I wish you could release it to me......

FYI

If filling up intakes from EGR exhaust asshole soot shitter mode........ it might be a bad injector causing a problem.

Could be the lash on the PD ramps setting or worn or even a leaker.

Try to measure for uneven temps at ports, to determine which one is most cold.

Another reason EGT on every cylinder isn't a bad thing in a fine truck like this.

I got to see an experiment on a V10 converting the PD to CR at the lab. OMFG!

I told Uwe if he ever drives one of these monsters he will be forced to buy one the next day.........:D

I have a brand new injector if you think you need it...........
 
   #118  

Flaps10

Verified VCDS User
Verified
Joined
Jun 20, 2014
Messages
512
Reaction score
952
Location
USA
VCDS Serial number
C?ID=219700
For anyone who hasn't driven a V10 TDI I'll try and put some perspective on it. I also own a Cayenne S, with a 4.5 V8. Off the line the Touareg will stomp the crap out of the Cayenne by such a large margin that it's not even worth putting them head to head just to make sure. And with the torque peak at 1800 rpm it does it with no drama of any kind (other than your head getting really heavy and peripheral vision starting to fade).

So Jack, you're saying I have a "pump duese" (combination injector/high pressure pump) which is either INOP or duming fuel? Will either condition result in a cold cylinder? I'm finding it confusing how the bad injector would gum up the intake manifold, since TDI specifies direct injection. My intake manifolds should contain nothing but clean air at +1 atmosphere when it's getting busy.

Or is this saying that the dumped fuel is so thick that getting it pumped back through the intake via the EGR system is the source?
 
   #119  

Jack@European_Parts

Gone But Not Forgotten
Professional VCDS User
Joined
Jan 29, 2014
Messages
21,923
Reaction score
9,308
Location
Montgomery, NY, USA
VCDS Serial number
C?ID=57337
Or is this saying that the dumped fuel is so thick that getting it pumped back through the intake via the EGR system is the source?

Bingo.......... or stuck open!

When fuel is dumped by means of a faulty, or out of time injector helical ramp.......... you can get incomplete combustion.

Incomplete combustion equals soot!

The thing being a V10 hides the miss in many cases or is just too slight.

Additionally!

Over filled oil sump or oil being sucked into the combustion chamber, by means of the exhaust gases remediation path......... is also a very good possibility!

This is very likely if the temps are shown to be with more, or less continuity for the exhaust ports.

Time to fix the cause, not treat the car with figurative pills.........:p

NostraJackAss has Spoken..........!
 
Last edited:
   #120  

Flaps10

Verified VCDS User
Verified
Joined
Jun 20, 2014
Messages
512
Reaction score
952
Location
USA
VCDS Serial number
C?ID=219700
Fair enough. I'm actually quite sure I overfilled the car early on, and it may have precipitated all of this.

Again, for the benefit of anyone who ends up owning one of these things: DON'T BOTHER LOOKING AT THE DIP STICK. It will show a dry engine no matter what, or at least on this particular car it does. I panicked and started adding oil. I was probably on my second quart when I started not feeling well about it. You see, the car has an oil level sensor too, and if the car were as low as the stick portrayed then the MFD should be flipping out.

When I was doing the controllers recently I drained the oil and filled it, staying a little on the low side. The dip stick remained dry the entire time.
 
Back
Top