
- Joined
- Jan 25, 2018
- Messages
- 17
- Reaction score
- 20
- Location
- Phoenix, AZ
- VCDS Serial number
- C?ID=290995
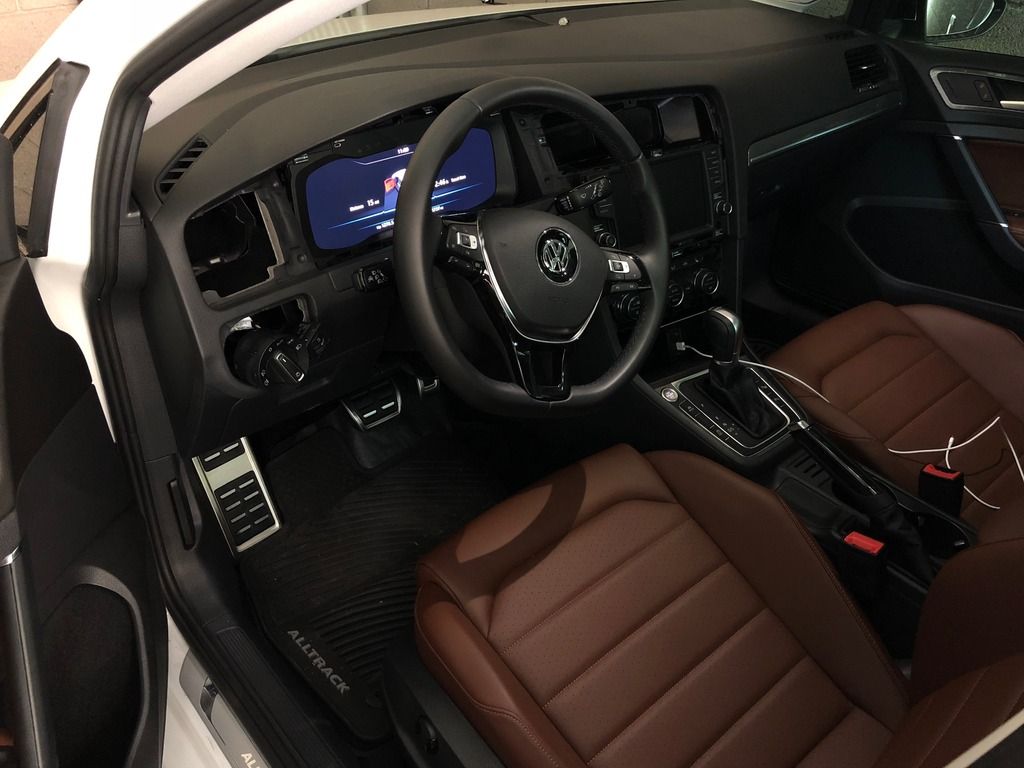
I've successfully retrofitted an AID into my 2017 Golf Alltrack SEL. Since I couldn't find a thread with detailed information on any of the forums, I thought I'd create one myself to share what I learned. Figuring out how to correctly code the new cluster for my car was the hardest part for me. The rest wasn't that difficult to do. I really like the Alltrack and I'm very pleased with mine overall, but the flat cluster they come equipped standard here in NA, with its monochromatic MFD screen, looks so cheap and for me at least, it has always lessened my driving pleasure.
PARTS NEEDED
I sourced the parts below with the help of my local VW parts department using the VIN of a German-spec 2018 Golf Alltrack.
Active Information Display - 5G1 920 791
I got mine from e-acca.com for about $1450 when I ordered it in 06/2018.
AID Bezel - 5G0 857 189 B FQZ (Polar Night)
NOTE: if you have a 2017 Alltrack like I do, this will not match the rest of your existing Dark Magnesium interior trim. The new Polar Night finish is a noticeably darker metallic gray. I decided to wrap mine using Avery Gray Metallic vinyl. It's a very close but not perfect match, so I opted to have all of my trim pieces professionally wrapped, including the passenger side air vent and panel around headlight switch and dimmer. I'll post pictures here once I get them back and install them.
Fiber Optic Splitter Cable - from eBay:
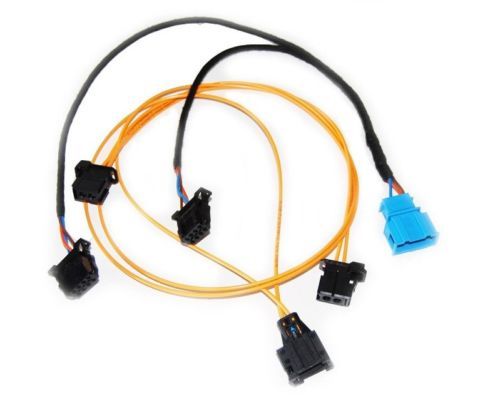
https://www.ebay.com/itm/18e1-Kabel...3713476927 43&_trksid=p2060778.c100290.m3507
NOTE: You only need the dark yellow splitter cable; the other harness is extra.
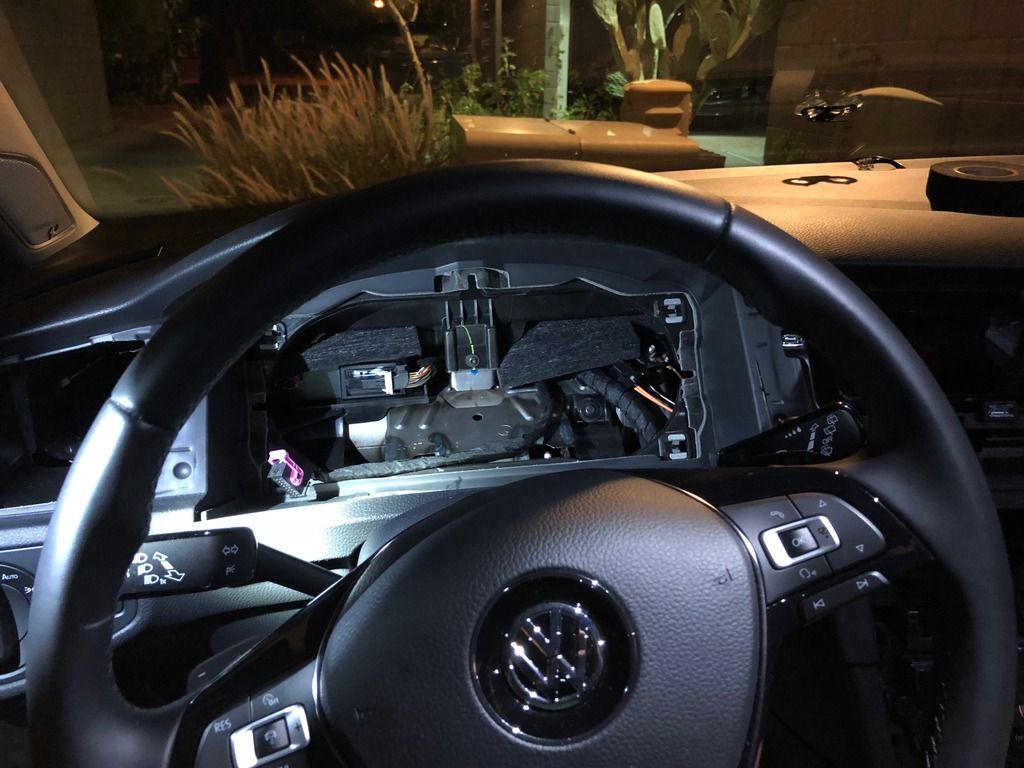
If you haven't done so, hook up VCDS and create a complete mapping for modules 17 and 5F for later reference. Begin by removing the interior trim piece with the air vents that goes around the touch screen. Start at the bottom and slowly work your way up. You'll have to remove the air vent on the driver side near the door first to be able to remove the trim that goes around the cluster. I found it easier to pull out the headlight switch then remove the single screw holding the trim that goes around the headlight and dimmer switches so I could push out the air vent with my hand. The cluster itself is held in place by 4 really hard to pull clips and 2 torx screws on the bottom. Lower the steering wheel column all the way down and gently pull the horizontal plastic trim piece at the bottom of the cluster out towards you. This video might be helpful:
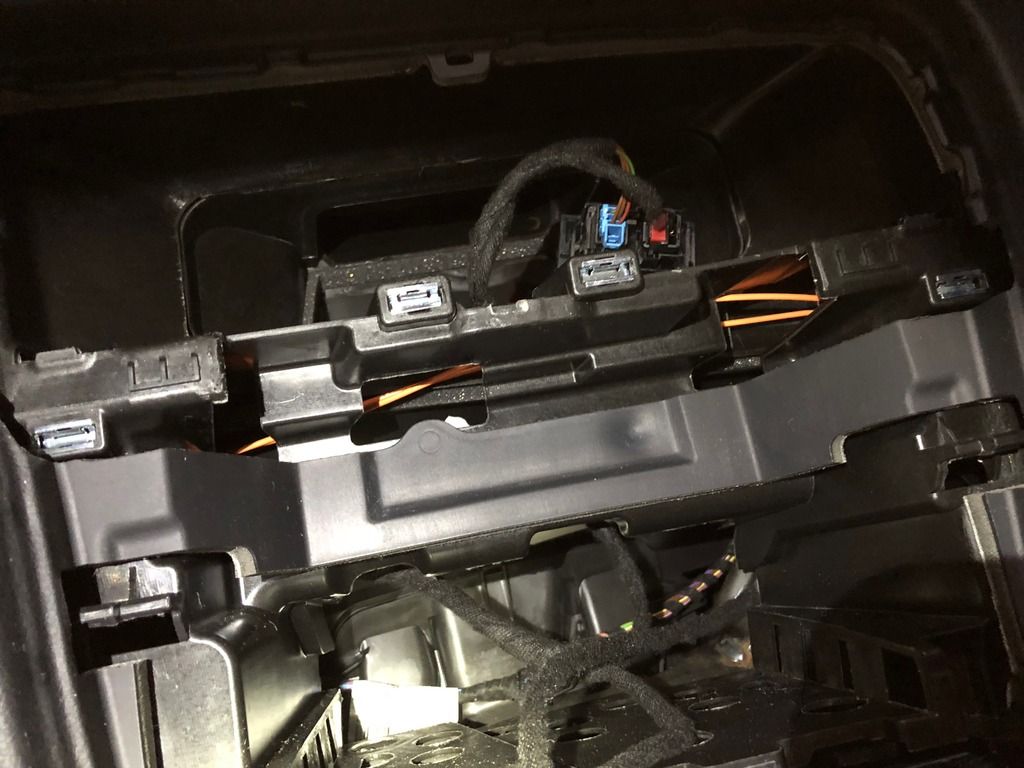
Once all trim is carefully removed and you unscrew the 2 screws at the bottom of the cluster, pull the old cluster out if you can. This is really hard to do and you will need gloves to get a good grip. Next, you will need to remove your MIB2 head unit in the glove box, disconnect all wires in the back, remove your touch screen and run the splitter cable from the glove box to the opening behind where the cluster is located. I ran a piece of wire through the MIB2 opening slot then through an opening immediately to the top and guided it towards the air vent opening in the center of the dash. I did this late at night out on my driveway in the Phoenix summer heat, so I apologize for the bad pictures but there just wasn't enough light:
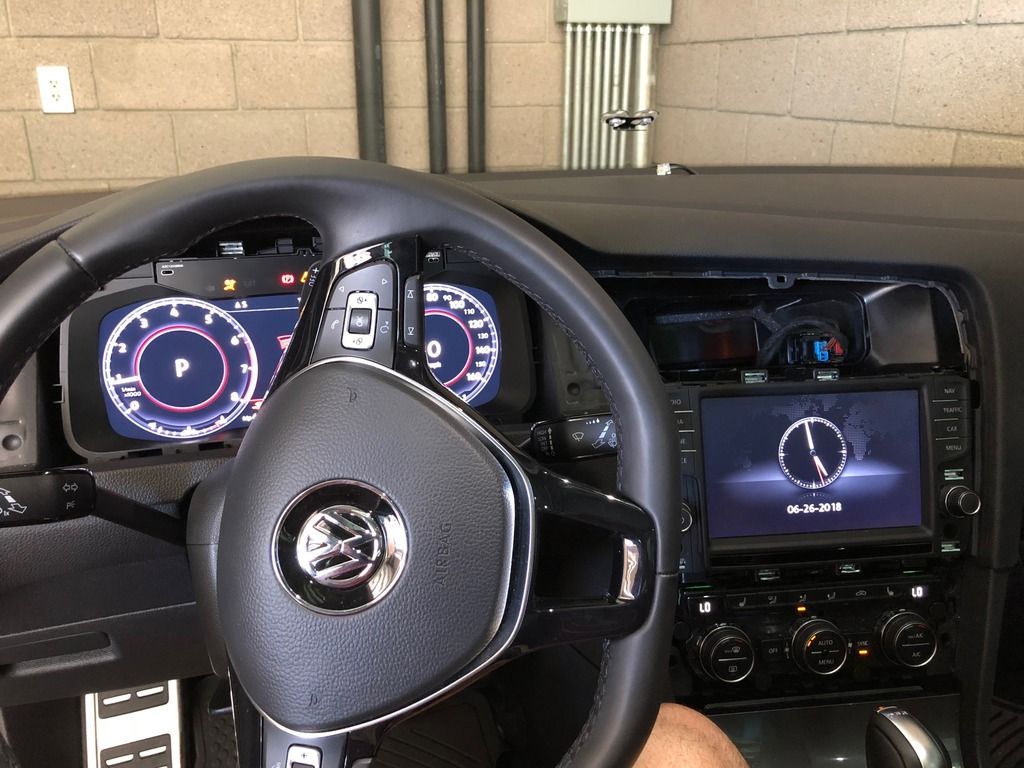
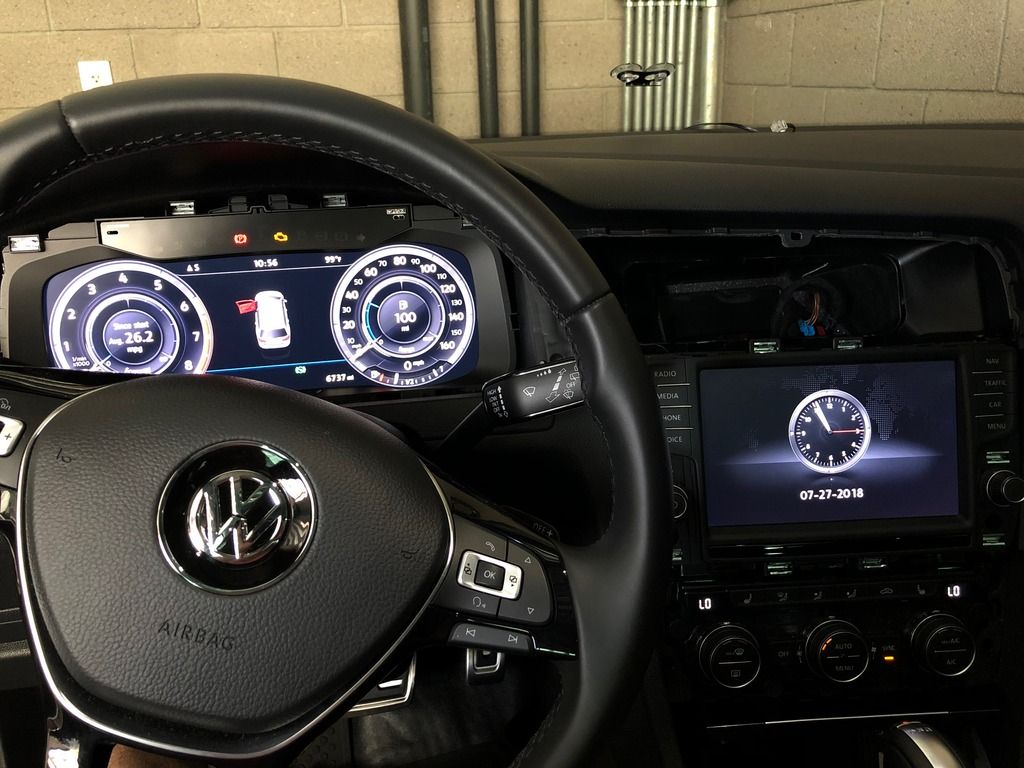
If you are not able or don't want to remove the old cluster yourself, then just run the fiber optic cable as close to the cluster as you can and your VW tech should be able to easily pull it through for you after he takes out the old cluster. Have your local VW dealership code the AID to your car and immobilizer using ODIS and be sure to take both your keys with you. Also make sure you reconnect module 5F (MIB2) to the car again before ODIS coding to avoid any issues with your coding. I accidentally left mine unplugged and had to run ODIS twice because of that. This is what your new digital cockpit will look like after coding with ODIS. It will be functional, but the graphical representation of the car will be a regular Golf, not Variant/SportWagen, and the display depiction will also be the one for the Golf Trendline:
Now here comes the fun part.. coding with VCDS! It's actually rather easy to do, it was trying to figure it all out on my own that was difficult and time consuming.
Go to Module 17, Coding, Long Coding Helper, Byte 2, Bit 3-6 and change it to 50 Model: Variant A (stock setting is 10 Model: Variant 2):

OPTIONAL: If you'd like needle sweep and lap timer, tick the boxes for Bit 0 and Bit 3 in Byte 1:
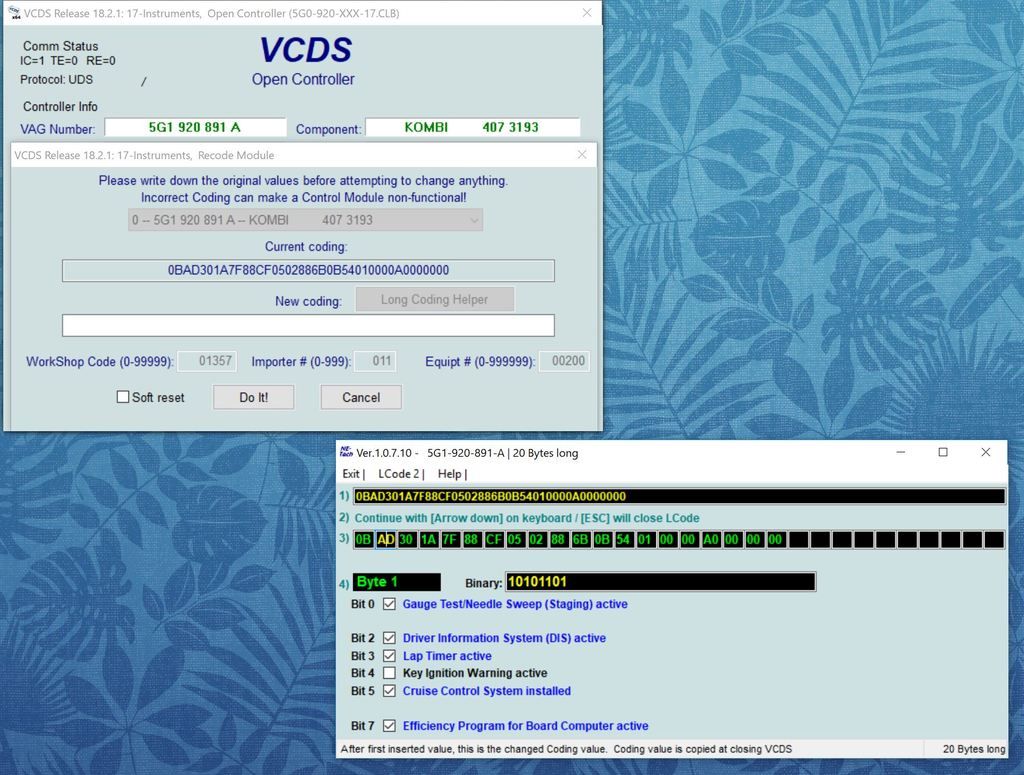
Go to Byte 12 and check the box for Bit 2 - Alternative Dimming Function active:

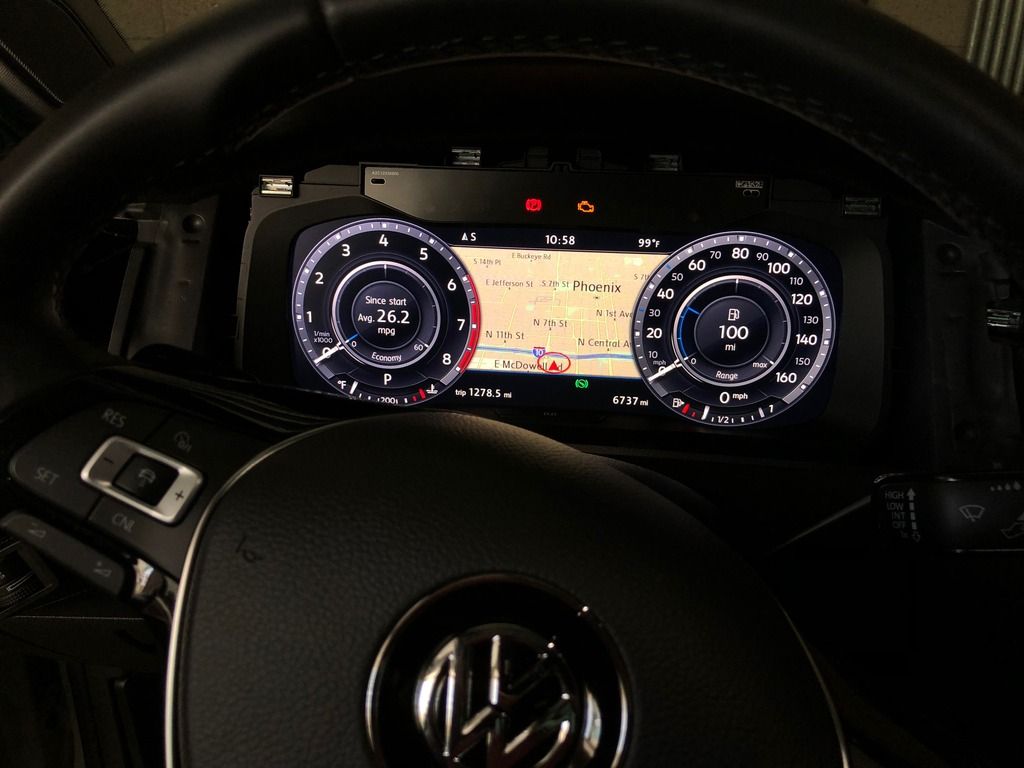
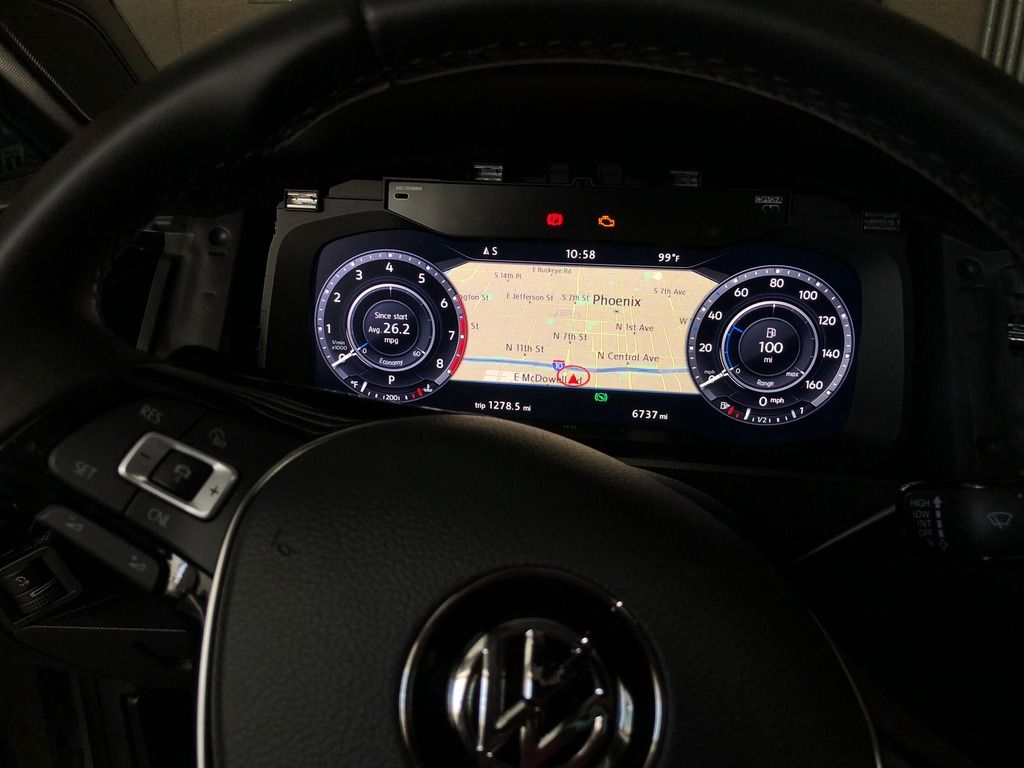
Now go to Adaptations and choose the channel Display depiction and change it from Version 1 to Version 2 (this will enable NAV in the AID screen; Version 1 doesn't support it. I couldn't figure out why my navigation map would not show up on the AID after everything was enabled and it was all because of this setting)
Then go to Tube_version and change the channel setting to variant_2 to get the AID speedo and tach versions specific to the Alltrack:
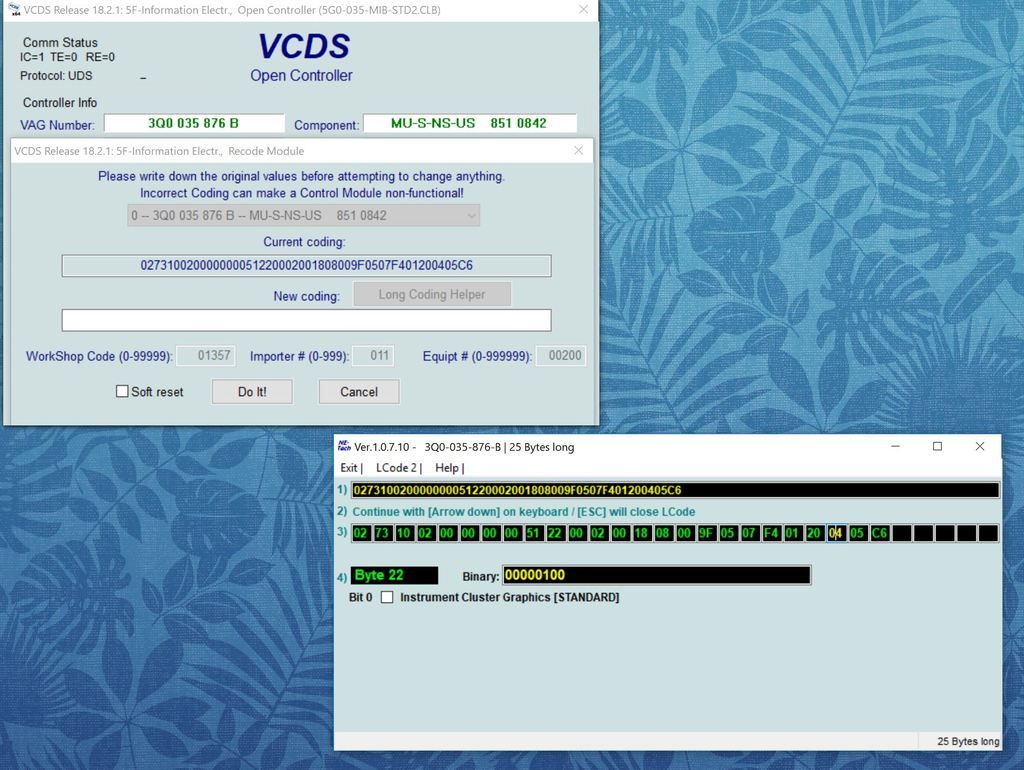
Open module 5F and open Long Coding Helper; go to Byte 22 and uncheck Bit 0 - Instrument Cluster Graphics [STANDARD]:
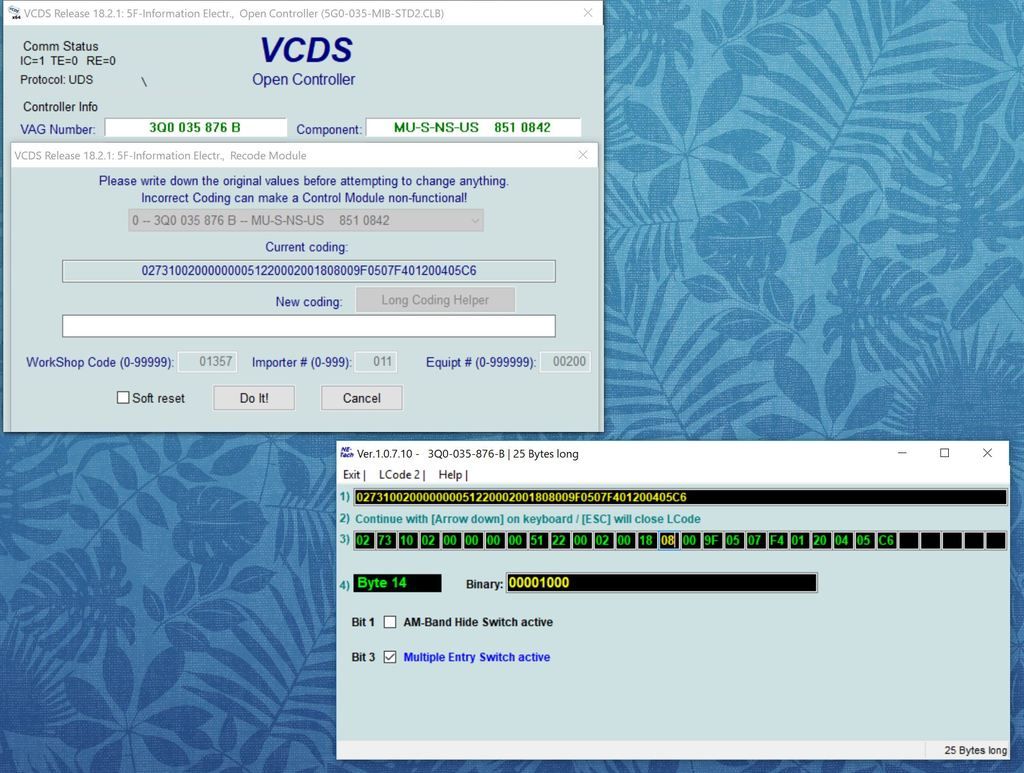
OPTIONAL: If you don't use the AM band on your radio and you'd like to be able to toggle between FM and Satellite only, tick the box for Bit 3 in Byte 14:
Go to Adaptations in Module 5F and change the following channels to the settings below:
Dashboard_Display_Configuration-ability_switch_nav_maps ---> On (enables the toggle switch on the touch screen)
Dashboard_Display_Configuration-call_picture ---> On
Dashboard_Display_Configuration-fastlist_most ---> On
Dashboard_Display_Configuration-navigation_map_compression_mode ---> H264
Dashboard_Display_Configuration-navigation_map_transmission_mode ---> MOST_streaming
That's it! Enjoy driving your Alltrack with its new, fully functional digital dash!

I still have to install the interior trim pieces once I get them back. I'll post more pictures when it's all finished.
PARTS NEEDED
I sourced the parts below with the help of my local VW parts department using the VIN of a German-spec 2018 Golf Alltrack.
Active Information Display - 5G1 920 791
I got mine from e-acca.com for about $1450 when I ordered it in 06/2018.
AID Bezel - 5G0 857 189 B FQZ (Polar Night)
NOTE: if you have a 2017 Alltrack like I do, this will not match the rest of your existing Dark Magnesium interior trim. The new Polar Night finish is a noticeably darker metallic gray. I decided to wrap mine using Avery Gray Metallic vinyl. It's a very close but not perfect match, so I opted to have all of my trim pieces professionally wrapped, including the passenger side air vent and panel around headlight switch and dimmer. I'll post pictures here once I get them back and install them.
Fiber Optic Splitter Cable - from eBay:

https://www.ebay.com/itm/18e1-Kabel...3713476927 43&_trksid=p2060778.c100290.m3507
NOTE: You only need the dark yellow splitter cable; the other harness is extra.
If you haven't done so, hook up VCDS and create a complete mapping for modules 17 and 5F for later reference. Begin by removing the interior trim piece with the air vents that goes around the touch screen. Start at the bottom and slowly work your way up. You'll have to remove the air vent on the driver side near the door first to be able to remove the trim that goes around the cluster. I found it easier to pull out the headlight switch then remove the single screw holding the trim that goes around the headlight and dimmer switches so I could push out the air vent with my hand. The cluster itself is held in place by 4 really hard to pull clips and 2 torx screws on the bottom. Lower the steering wheel column all the way down and gently pull the horizontal plastic trim piece at the bottom of the cluster out towards you. This video might be helpful:
Once all trim is carefully removed and you unscrew the 2 screws at the bottom of the cluster, pull the old cluster out if you can. This is really hard to do and you will need gloves to get a good grip. Next, you will need to remove your MIB2 head unit in the glove box, disconnect all wires in the back, remove your touch screen and run the splitter cable from the glove box to the opening behind where the cluster is located. I ran a piece of wire through the MIB2 opening slot then through an opening immediately to the top and guided it towards the air vent opening in the center of the dash. I did this late at night out on my driveway in the Phoenix summer heat, so I apologize for the bad pictures but there just wasn't enough light:


If you are not able or don't want to remove the old cluster yourself, then just run the fiber optic cable as close to the cluster as you can and your VW tech should be able to easily pull it through for you after he takes out the old cluster. Have your local VW dealership code the AID to your car and immobilizer using ODIS and be sure to take both your keys with you. Also make sure you reconnect module 5F (MIB2) to the car again before ODIS coding to avoid any issues with your coding. I accidentally left mine unplugged and had to run ODIS twice because of that. This is what your new digital cockpit will look like after coding with ODIS. It will be functional, but the graphical representation of the car will be a regular Golf, not Variant/SportWagen, and the display depiction will also be the one for the Golf Trendline:

Now here comes the fun part.. coding with VCDS! It's actually rather easy to do, it was trying to figure it all out on my own that was difficult and time consuming.
Go to Module 17, Coding, Long Coding Helper, Byte 2, Bit 3-6 and change it to 50 Model: Variant A (stock setting is 10 Model: Variant 2):

OPTIONAL: If you'd like needle sweep and lap timer, tick the boxes for Bit 0 and Bit 3 in Byte 1:

Go to Byte 12 and check the box for Bit 2 - Alternative Dimming Function active:

Now go to Adaptations and choose the channel Display depiction and change it from Version 1 to Version 2 (this will enable NAV in the AID screen; Version 1 doesn't support it. I couldn't figure out why my navigation map would not show up on the AID after everything was enabled and it was all because of this setting)
Then go to Tube_version and change the channel setting to variant_2 to get the AID speedo and tach versions specific to the Alltrack:

Open module 5F and open Long Coding Helper; go to Byte 22 and uncheck Bit 0 - Instrument Cluster Graphics [STANDARD]:

OPTIONAL: If you don't use the AM band on your radio and you'd like to be able to toggle between FM and Satellite only, tick the box for Bit 3 in Byte 14:

Go to Adaptations in Module 5F and change the following channels to the settings below:
Dashboard_Display_Configuration-ability_switch_nav_maps ---> On (enables the toggle switch on the touch screen)
Dashboard_Display_Configuration-call_picture ---> On
Dashboard_Display_Configuration-fastlist_most ---> On
Dashboard_Display_Configuration-navigation_map_compression_mode ---> H264
Dashboard_Display_Configuration-navigation_map_transmission_mode ---> MOST_streaming
That's it! Enjoy driving your Alltrack with its new, fully functional digital dash!


I still have to install the interior trim pieces once I get them back. I'll post more pictures when it's all finished.

Last edited:


