
hi everyone looking to get any info on this leak. after car wash noticed no sound from speakers. right rear headliner was wet. volume came back after few hours. removed right rear panel to inspect. it has panoramic roof, poured water and noticed water leaking from right rear. poured on all corners of the roof, all corners drained about the same . hope to get some info before dropping the headliner.
You are using an out of date browser. It may not display this or other websites correctly.
You should upgrade or use an alternative browser.
You should upgrade or use an alternative browser.
09 q7 roof leak
- Thread starter ivagp
- Start date
Water drain hose behind
Water drain hose run(proceed) behind in the columns-C-and end in the wheel arch about the wheel arch bowl.
The cleaning occurs(takes place) from the lower wearing out.
(done by translation helper)
Water drain hose run(proceed) behind in the columns-C-and end in the wheel arch about the wheel arch bowl.
The cleaning occurs(takes place) from the lower wearing out.
(done by translation helper)
- Joined
- Feb 13, 2014
- Messages
- 2,693
- Reaction score
- 3,007
- Location
- Magdeburg, Germany
- VCDS Serial number
- HN0-nnnnnn
The Q7 and A6 Avant have a common problem with the rear wiper/washer. The washer supply/pipes break near the rear lid/hatch, resulting in washer fluid dropping right onto the infotainment system (with the sound system on top). This is a common issue and Audi is aware of it. If I remember correctly, they might even cover this (partially) under warranty. The sound system is likely beyond repair, just make sure not to use the (rear) washer until this has been checked and fixed.
Here an overview
IMAGE REMOVED DUE TO COPYRIGHT ISSUES
IMAGE REMOVED DUE TO COPYRIGHT ISSUES
Last edited by a moderator:
Here an overview
IMAGE REMOVED DUE TO COPYRIGHT ISSUES
thank you. has any one had audi cover this after warranty.
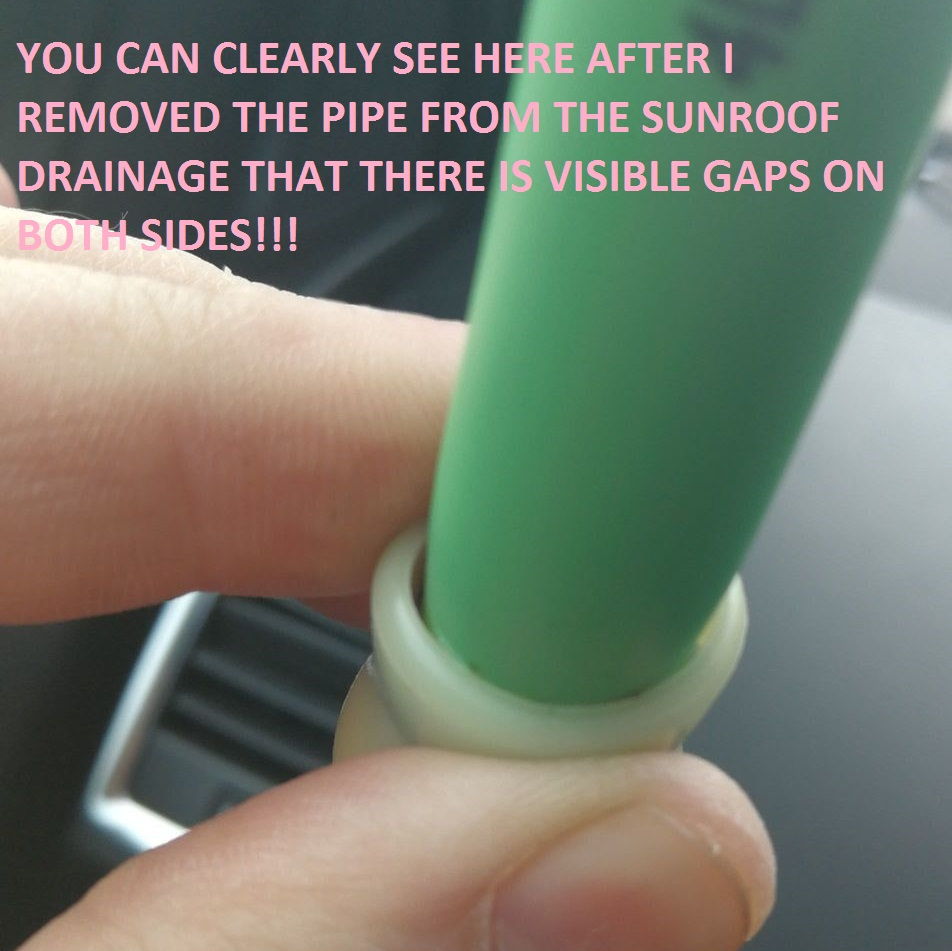
Sorry to dig a old thread up, but the issue is still going on for owners! Just wanted to share my experience with my leaking roof, since I did the repair myself. I wanted to make the cheapest repair possible, but also one that will last a LONG time. It cost me £4.50 / $6.22 to repair it. Initially my driver side (RHD) had water on the foot well /matt, but when I inspected all 4 corners of the drainage, all of them were on their way out or already gone and started to leak. The chances are, if one is leaking they all will be very very soon.
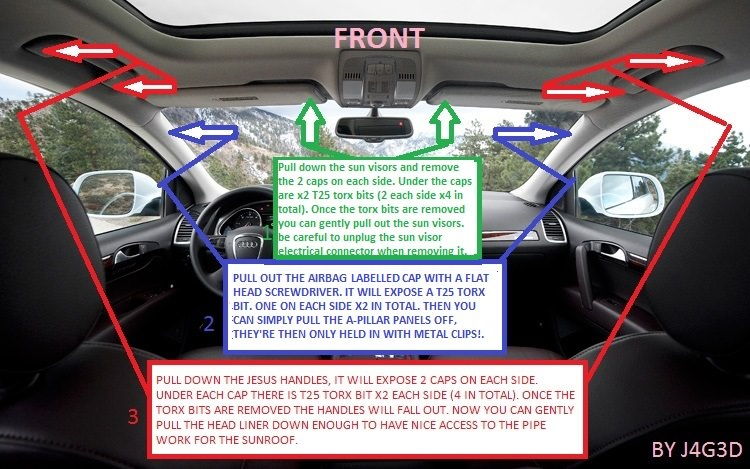
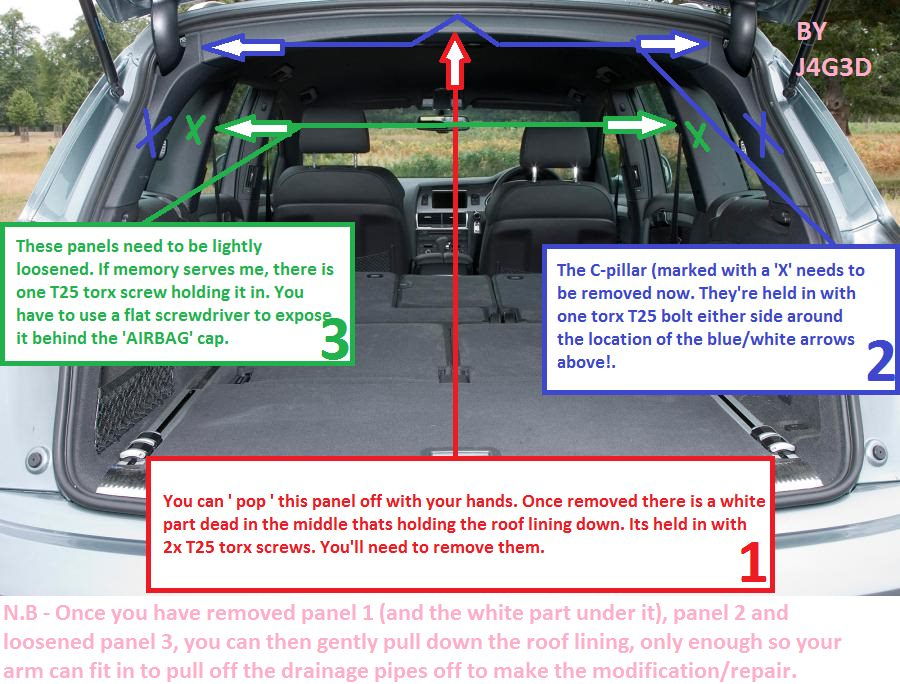
Its very easy to do. You don't need to drop the roof liner completely. You only need to reach your arm in on each corner, by dropping just the corners. The fronts are easier to do, i'd say. The rear needs your arm going in under the liner a little way more than the front!. But overall its a simple job even for the competent DIYer. It took me 1 hour in total. In fact, it took me longer to put the sun visors back on that to do the entire job!...they can be a fiddle to put back, but easy to take off.
I ADVISE YOU TO FIX THE PROBLEM BEFORE IT OCCURS! OR FIX ALL 4 CORNERS EVEN IF ONLY ONE IS LEAKING (OR NONE AT ALL) IT CAN SAVE YOU 3K+ IN DAMAGES!.
What you need:
- T25 TORX BIT and screwdriver for it or ratchet to remove all the parts holding the roof liner on
- WEATHER RESISTANT ADHESIVE (i used everbuild stixall like this one: https://www.bcprofiles.co.uk/everbu...MIsOTav52w2QIVBZPtCh0ihgJ-EAQYAyABEgJfvvD_BwE)
- A flat head screwdriver.
- A HEAT GUN/LIGHTER OR SOMETHING TO HEAT THE PIPE UP TO MAKE IT SOFT.
- A sharp knife to cut the hose at the base
- A pair of pliers or something that will help stretch the pipe once heated up.
- CABLE TIE (optional)
FRONT
REAR
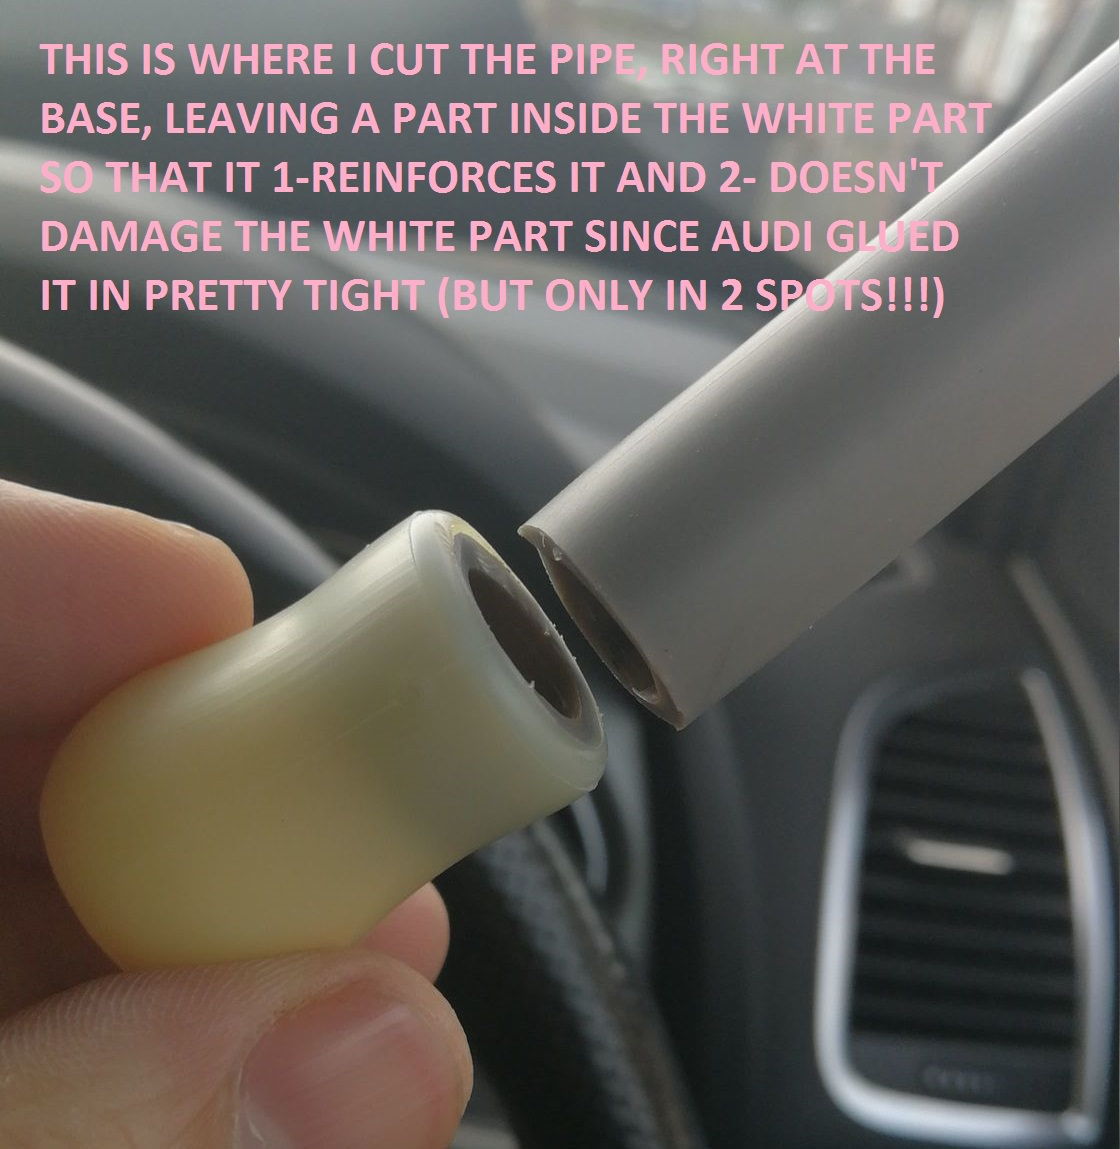
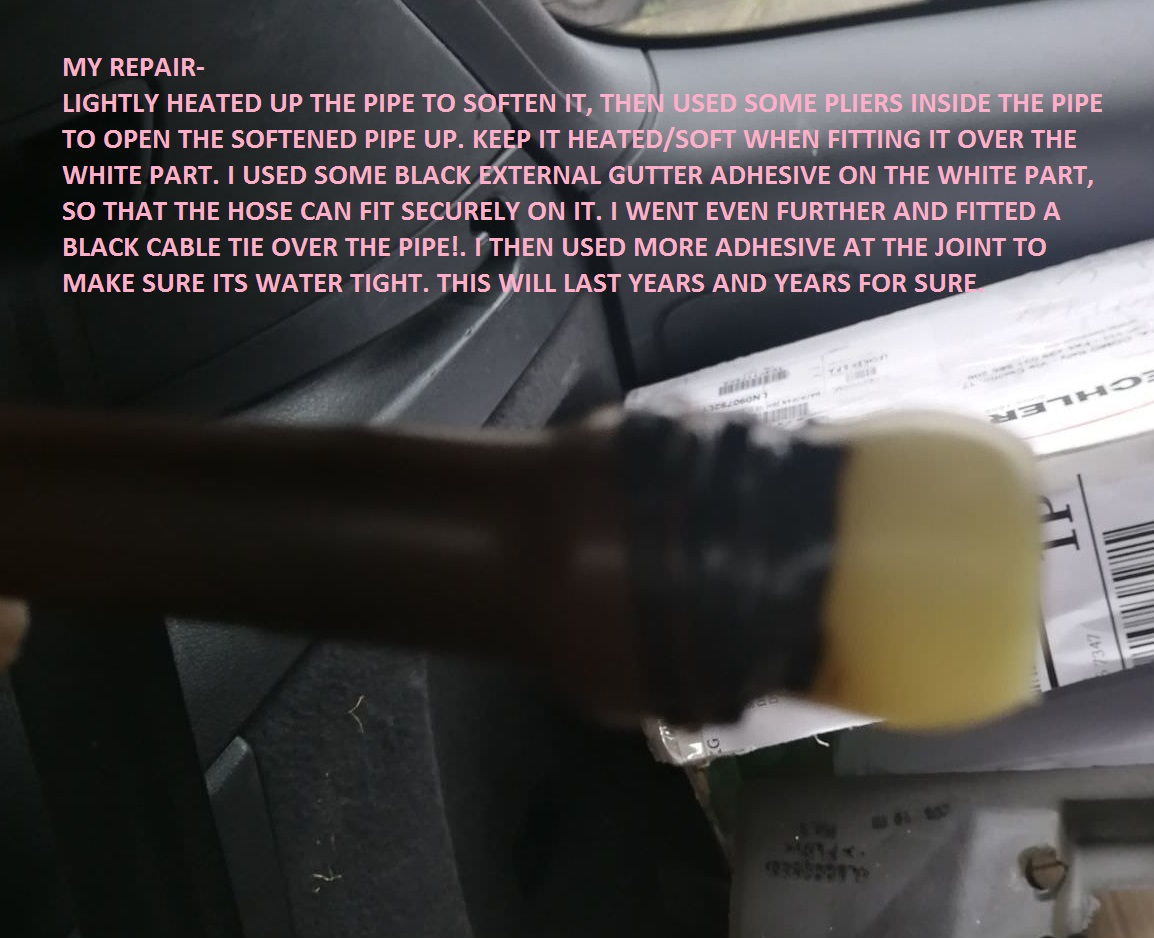
For the fix, I CUT the pipe right at the base of the white part, then I heated the pipe up so that is becomes flexible, i stretched it quite a bit so that it now goes OVER that white part rather than sitting inside it. I used black adhesive glue, which i think is used on house guttering repairs. Its water proof and tough. ONTOP of that i used a small cable tie. It is now secure as hell, all 4 of them. I checked the car 2 days later after it had been raining a lot.....DRY FLOORS! and NO DRIPS from the repair. After you've made the repair you can open the sunroof up and tip water into the drain holes, then check if its leaking.
This is one of the pipes before the fix...
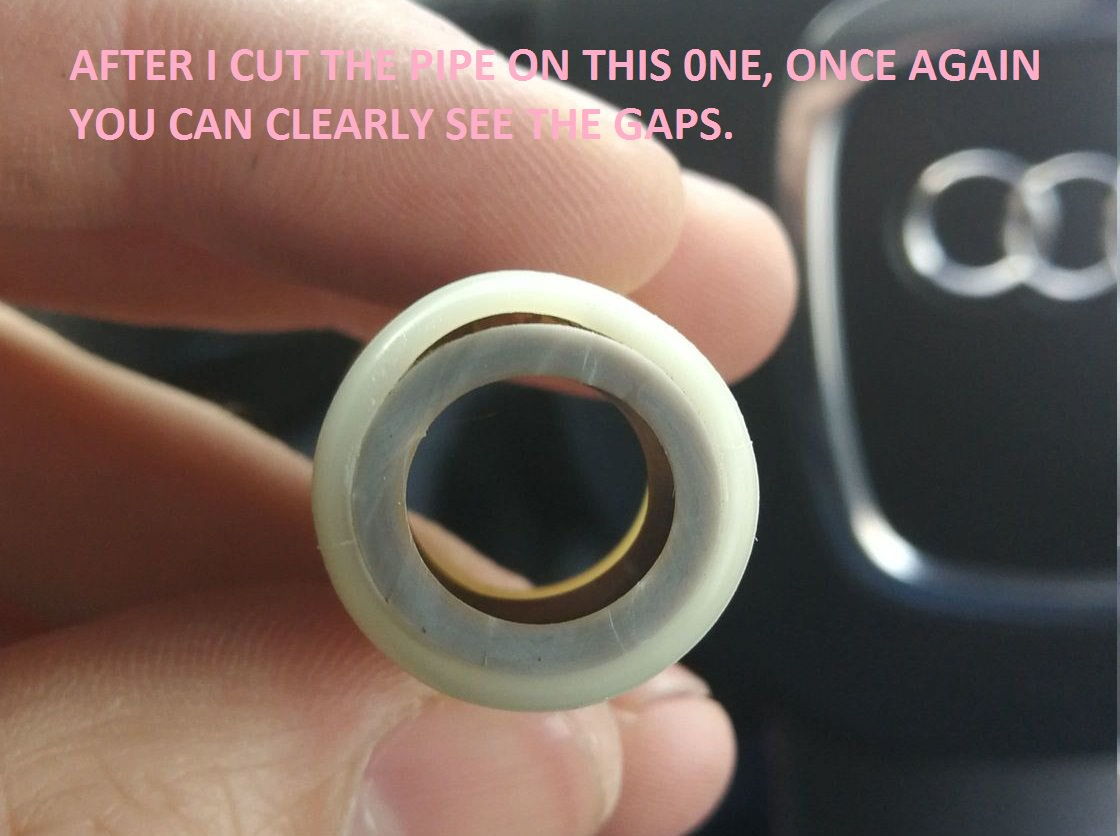
This is where i cut it... the reason i left part of the pip inside the white part is because it reinforces it. plus the 2 spots of glue used at factory are quite strong.
After i cut it you could clearly see where the gaps are.
This is my fix (sorry bad lighting)
There is other people making the fix on youtube, but no guide on how to take the parts off. I hope my guide is accurate as I did do the job a couple of weeks ago now, so Im trying to remember everything I did.
Hope that this helps others out and gives others confidence in repairing the job themselves.
Its very easy to do. You don't need to drop the roof liner completely. You only need to reach your arm in on each corner, by dropping just the corners. The fronts are easier to do, i'd say. The rear needs your arm going in under the liner a little way more than the front!. But overall its a simple job even for the competent DIYer. It took me 1 hour in total. In fact, it took me longer to put the sun visors back on that to do the entire job!...they can be a fiddle to put back, but easy to take off.
I ADVISE YOU TO FIX THE PROBLEM BEFORE IT OCCURS! OR FIX ALL 4 CORNERS EVEN IF ONLY ONE IS LEAKING (OR NONE AT ALL) IT CAN SAVE YOU 3K+ IN DAMAGES!.
What you need:
- T25 TORX BIT and screwdriver for it or ratchet to remove all the parts holding the roof liner on
- WEATHER RESISTANT ADHESIVE (i used everbuild stixall like this one: https://www.bcprofiles.co.uk/everbu...MIsOTav52w2QIVBZPtCh0ihgJ-EAQYAyABEgJfvvD_BwE)
- A flat head screwdriver.
- A HEAT GUN/LIGHTER OR SOMETHING TO HEAT THE PIPE UP TO MAKE IT SOFT.
- A sharp knife to cut the hose at the base
- A pair of pliers or something that will help stretch the pipe once heated up.
- CABLE TIE (optional)
FRONT
REAR
For the fix, I CUT the pipe right at the base of the white part, then I heated the pipe up so that is becomes flexible, i stretched it quite a bit so that it now goes OVER that white part rather than sitting inside it. I used black adhesive glue, which i think is used on house guttering repairs. Its water proof and tough. ONTOP of that i used a small cable tie. It is now secure as hell, all 4 of them. I checked the car 2 days later after it had been raining a lot.....DRY FLOORS! and NO DRIPS from the repair. After you've made the repair you can open the sunroof up and tip water into the drain holes, then check if its leaking.
This is one of the pipes before the fix...
This is where i cut it... the reason i left part of the pip inside the white part is because it reinforces it. plus the 2 spots of glue used at factory are quite strong.
After i cut it you could clearly see where the gaps are.
This is my fix (sorry bad lighting)
There is other people making the fix on youtube, but no guide on how to take the parts off. I hope my guide is accurate as I did do the job a couple of weeks ago now, so Im trying to remember everything I did.
Hope that this helps others out and gives others confidence in repairing the job themselves.
Last edited: